In Microsoft Word, a page break is an invisible marking that separates one page from the next. This formatting mark enables content to flow seamlessly from one page to the next. Also, when you print the document, the printer uses the page break to decide where the first page ends and the second begins. A page break governs the layout of your document and enables you to place your content on the appropriate page. Let’s start by learning how to add a page break in Word and then how to remove a page break. The following images are from Word for Microsoft 365.
Page Breaks Two Types
Word has two types of page breaks and a few more document breaks, such as section breaks. Today, we will solely discuss page breaks.
- When you navigate from one page to the next, automatic page breaks are added by Word.
- Manual page breaks may be added anywhere in the document to break it up and progress to the next page.
You cannot remove automatic page breaks but you may change where they appear. You have control over the position of manual page breaks since you add them yourself.
How To Add Page Break?
You’ll find that using page breaks in Word makes formatting your document simpler once you start using them. For example, you may use a page break to position a table or a picture on a new page rather than cluttering it on the previous one. Before we begin, click the Home > Paragraph Group > Show/Hide button to display your document’s hidden page break marker. To manually add them to your document.
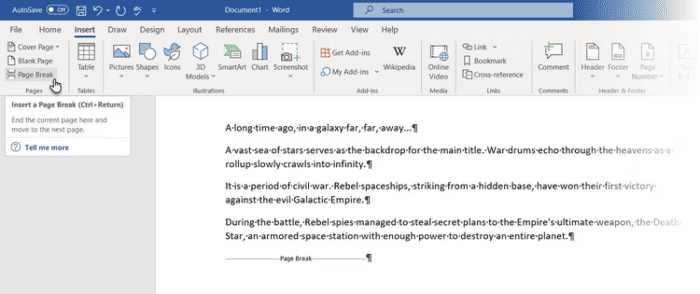
- Set your cursor to where you want one page to finish and the next to begin.
- Go to the Pages group’s Ribbon > Insert > Page Break.
Keyboard Shortcut: Ctrl + Enter is a keyboard shortcut for swiftly inserting a page break.
How To Remove Page Break In Word?
A manual page break may be inserted anywhere in a Word document to compel the text to begin at the top of the next page. But, with Word, how can you delete a page break? Here are two simple methods to delete page breaks in Word.
How To Remove Page Breaks In Word With Delete?
- Open your Microsoft Word document.
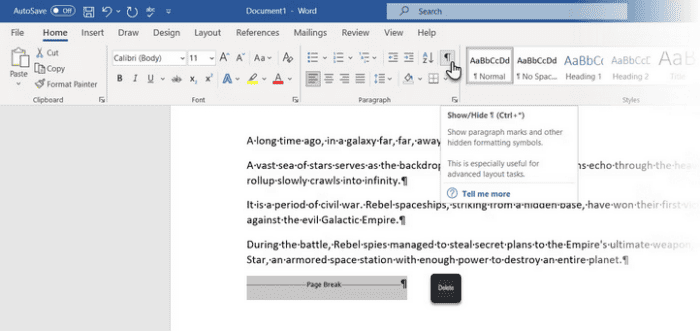
- Return to Home > Click the Show/Hide button to display all non-printable hidden markings in the document, such as page breaks, spaces, and non-breaking spaces.
- To select a page break, double-click it and then click Delete.
- You may now conceal the additional formatting marks in the document by clicking the Show/Hide button again.
- Instead of double-clicking, place your cursor right before the page break point and press the Delete key.
How do you undo a deleted page break? As previously stated, use Ctrl + Z to undo or re-add the remove.
How To Remove Page Break In Word With Find And Replace?
- To open the Find and Replace box, use Ctrl + H.
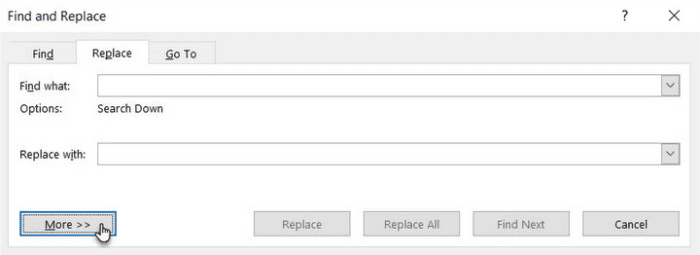
- Choose the Replace tab. To open all other options, click the More and Find What text boxes.
- Next, click Special and pick Manual Page Break from the drop-down option.
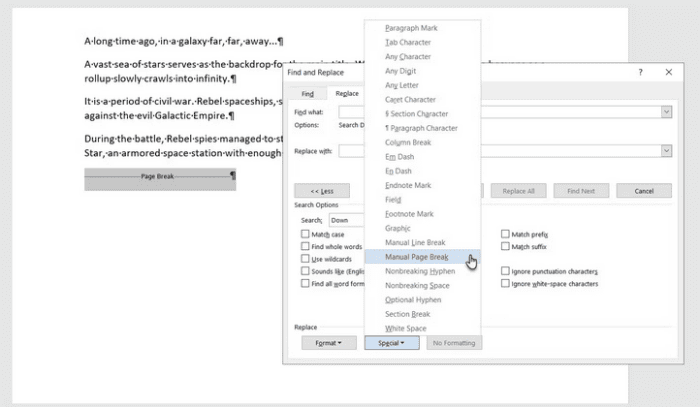
- Leave the Replace box empty and select Replace All to replace every page break in the document with a space at once.
Also: Turn Off Track Changes To Delete Manual Page Breaks
You may question why you can’t get rid of manual page breaks. You cannot remove manual page breaks when Track Changes is switched on. Track Changes should be turned off.
- Navigate to the Ribbon’s Review tab.
- In the Tracking group, choose Track Changes > Track Changes.
- To turn off tracking, select Track Changes from the drop-down option.
- Track Changes may also be turned off by pressing Ctrl + Shift + E.
How To Insert Automatic Page Break At The Right Place?
It is not possible to disable automatic page breaks. However, using the Pagination options, you may control their position in Word. This enables you to modify the settings for how Word handles paragraphs across page breaks and manages the space between paragraphs.
Go to Ribbon > Home > Paragraph > Paragraph Settings (click the little arrow) > Line and Page Breaks tab to find the Pagination option.
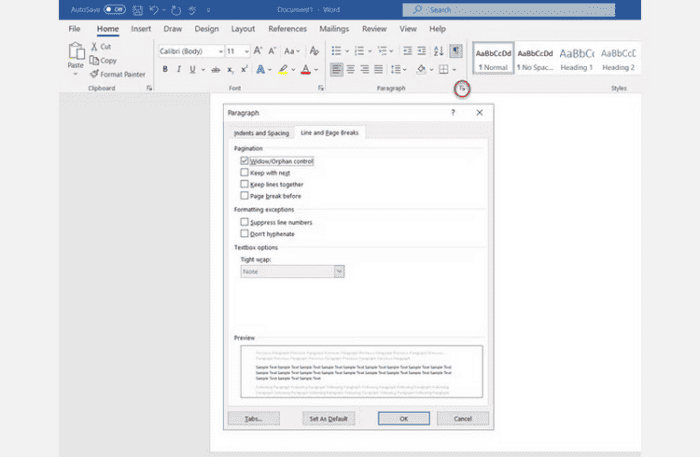
You can also select Paragraph from the menu by right-clicking anywhere on the page. Choose the paragraphs to which you wish to apply the settings. Then, under the Line and Page Breaks settings, add a checkmark next to one or all options.
- Widow/Orphan – The term “widow” refers to the last line of a paragraph at the top of a page. “Orphan” is the first line of text at the bottom of a page. Place a checkmark on this option, and Word will add at least two paragraph lines to the top or bottom of the page.
- Keep with next – This option avoids breaks between paragraphs that should be kept together. For example, instead of having the header on one page and the Paragraph on another, you may keep the heading and Paragraph below.
- Keep lines together – This helps to tie lines together and eliminates page breaks amid paragraphs.
- Page break before – This option enables you to display a page break before a certain paragraph and add one before the Paragraph.
Troubleshooting Page Breaks In A Word Document
The settings mentioned above are important if you need help understanding why a layout exists, even with the Show/Hide button turned on. One of the most prevalent causes of page break issues, for example, is the disabled Keep with Next option, which breaks a paragraph or a table over successive pages. Word prevents adding a page break in a text block when the Keep lines together option is activated at the top. As Word moves the block or Paragraph to the next page, it may leave a lot of whitespace.
Page Breaks For Neat Documents Importance
If you don’t use Page Breaks at every chance, use the Enter or Backspace keys to shift content down or up and fine-tune your layout. This may alleviate the issue temporarily, but it will reoccur when you add or delete additional content since the new lines cause everything to shift back to its previous position. And you have to redo everything (and again).
Instead, use the page break options. Page breaks and the above options assist in keeping paragraphs together. A table header, for example, may be combined with the table rather than being divided across pages. Page breaks aren’t the sole guidelines for well-designed Word documents. You may arrange your content in Word using column breaks, section breaks, and text wrapping. These options may be found on the Ribbon under Layouts > Breaks.
Also, Check:
Conclusion:
They may be aggravating when you don’t understand how page breaks function. Learn to see them using the Show/Hide button and eliminate the incorrect page break. A deleted page break may always be undone using the Undo button or the Ctrl + Z keyboard shortcut. However, if you apply them immediately, you will be fine making excellent reports and papers in Word.