Windows 7 was introduced almost a decade ago, and it was able to heal the reputation and credibility damage caused by the Vista debacle. Do you wish to download Windows 7 for nostalgia or run an outdated program or software? You’ve come to the correct spot. You may still download all Windows 7 versions on your outdated low-end Windows laptop or PC that cannot run a new Windows operating system, such as Windows 11/10. Or even a new laptop or computer. In this article, you’ll learn how to download the Windows 7 ISO, create a Windows 7 bootable, and clean install Windows 7 on an older PC.
Note: Microsoft no longer provides technical or security support for Windows 7 and instead encourages users to upgrade to Windows 11.
Update: Microsoft has just deleted all official direct download links for Windows 7.
Alternative direct download links from third-party sources are provided below.
Download Windows 7 ISO (Ultimate & Professional Edition)
Windows 7 Direct Download Link
These are direct download links for Windows 7 ISOs from Microsoft’s servers. Depending on the support of your processor, you may pick between 32-bit and 64-bit. Microsoft provides an easy approach for detecting whether a computer is 32-bit or 64-bit.
Update: The Home Premium Edition of Windows 7 ISO has been added. Please see the link provided below.
Besides processor support, 64-bit should operate perfectly if your PC has 8 GB or more RAM installed. The download links for Windows 7 ISO are in English. You may request other languages in the comments section below, and we will share them with you.
Update: The Windows 7 ISO download links have been updated.
| Windows Version | Windows 7 Ultimate ISO |
| Size | 5.5 GB |
| Service Pack | SP1 |
| Version | 32-Bit 64-Bit |
| Windows Version | Windows 7 Professional ISO |
| Size | 5.5 GB |
| Service Pack | SP1 |
| Version | 32-Bit 64-Bit |
| Windows Version | Windows 7 Home Premium ISO |
| Size | 5.7 GB / 3.8 GB |
| Service Pack | SP1 |
| Version | 32-Bit 64-Bit |
The alternative way that you can use to download Windows 7 ISO files from the official website by inputting the product key no longer works. The approach mentioned above is the only legal way to download Windows ISOs in the future.
Create Windows 7 Bootable USB/DVD
When you’ve finished downloading the operating system, it’s time to create a Windows 7 bootable. It’ll just take a couple of minutes to finish the process. Creating a bootable disk or drive while installing Windows 7 on a separate or several PCs is critical. To create a bootable Windows 7 disk, we will use Rufus, a free program utility. To get started, download the portable version.
Prerequisites
Windows 7 ISO file.
An 8 GB USB drive.
To prevent data loss, copy the files from your USB drive.
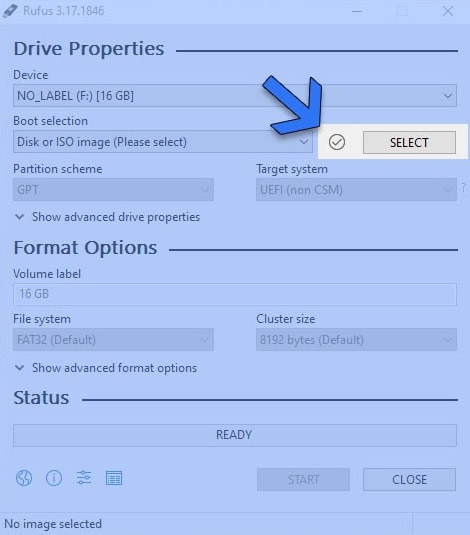
- Launch Rufus and select the drive where you want the bootable to be created. We used a 16 GB flash drive set for the purpose; however, an 8 GB flash drive will do for a single language Windows 7 install.

- To recognize your newly downloaded ISO image of Windows 7, navigate to the boot selection and click SELECT.
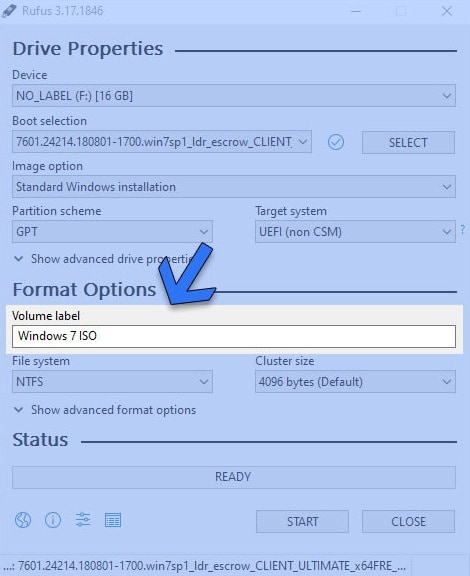
- The Format Options window will show a volume label dialog box when you load it. You may enter any name you choose. We called it “Windows 7 ISO” to simplify things.
- To begin the bootable creation process, click the START button.
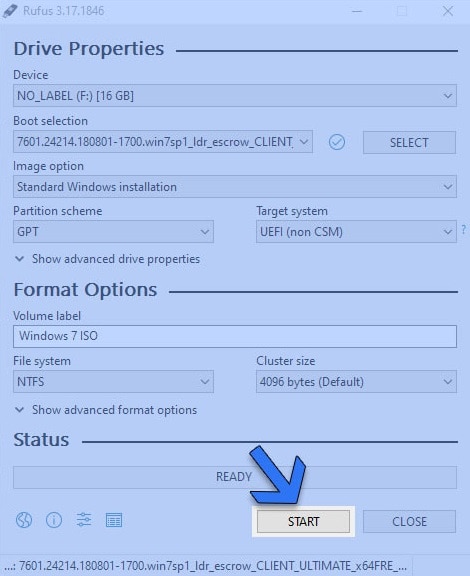
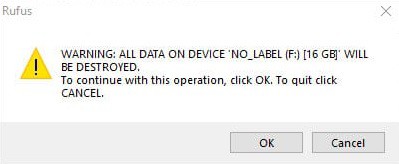
- Wait a second, and a warning about storing the data on your flash drive will display. To continue, click the OK button.
For a couple of minutes, sit back and relax. The length of the process depends on the speed of your flash drive and/or hard disk.
Clean Install 7 Windows ISO
Using Step 2, we created a bootable Windows 7 disk. It is time to restart your computer and boot from the bootable USB or DVD. The BIOS menu or the shortcut boot menu key may be used to set the boot order. It varies according to desktop and laptop motherboard manufacturers.
Laptops
| Brand | Boot Menu Key |
| ASUS | F8 |
| Acer | F12 |
| Dell | F12 |
| HP | F9 |
| Lenovo | F8, F10, F12 |
Desktops
| Motherboard Brand | Boot Menu Key |
| ASUS | F8 |
| Gigabyte | F12 |
| MSI | F11 |
| Intel | F10 |
| ASRock | F8, F11 |
| Biostar | F9 |
We’ll start the computer using the bootable USB we created for installing Windows 7.
- Well, after inserting the bootable flash drive into a USB port, restart your computer.
- The Windows booting logo will show on the screen when you boot from the flash drive.
- After the files have been loaded, the Windows installation procedure will display. Choose your language, time zone, currency, and typing technique.
- Then click the Next button to return to the main configuration screen.
- To begin the Windows 7 installation process, click the Install Now button.
- Tick the box that states “I accept the license terms” on the screen, then click the Next button.
- We will be given two installation options: Upgrade and Custom (advanced).
- To proceed, choose Custom and click the next button.
- Then, we’ll be in the partition selection menu. Pick the partition where you want to install Windows 7.
- The official suggestion for partition size is roughly 32 GB. For demonstration purposes, we selected a smaller partition.
- After choosing a partition, press the Next button.
- It is time to relax and wait for Windows 7 ISO to be installed on your computer.
- The installation time may vary depending on the speed of your storage and flash drive. SSD partitions are always quicker when installing any operating system.
- Now, your PC will restart several times as part of the process. There is no reason to be concerned.
- The final configuration will prepare your computer for your first use.
- Once set up, you will be asked to give your computer a name and a username for the account.
- After you’ve filled in the names, click the Next button.
- We’ll need to create a password for the user account once we’ve set up the user name.
- It will be asked when you log in to your computer. Be careful to create a complicated password that is easy to remember.
- Give your password a clue to help you remember it in case you forget it. To prevent being guessed by others, make your password hint obscure.
- You will be asked to input your Windows 7 product key on the next screen.
- Enter the key you have available and click the Next button. In other circumstances, you may click the skip button and complete the task later.
- You must now select the update settings. Select the first option if you need more clarification about the updates. Make use of the suggested parameters.
- You will now set a time and date. Click the Next button after choosing your region’s time zone.
- This option will prompt you for the current location of your computer. It wants to know what kind of network your computer is linked to.
Home Network – This is ideal for computers and gadgets that you recognize and are linked to a single network at home.
Work Network – Best for all recognized computers in a workplace network.
Public Network – Select this option if, for example, you need to identify all of the computers on the network in public areas.
- Select one of the options and the changes will be adjusted in a couple of minutes at most.
- Aces, you installed Windows 7 from an ISO file without a hitch.
Windows 7 Versions Overview
Windows 7 Starter
This version was designed particularly for entry-level PC users in developing economies. Compared to later Windows versions, it had severe restrictions, such as the absence of an Aero-glass motif. Furthermore, users may only run three programs at the same time. It was only available in a 32-bit version, and its design philosophy focused on simplicity and ease of use.
Windows 7 Home Basic
A step up from the Starter edition, the Home Basic version was aimed at developing economies and price-conscious customers. It provided some of Starter’s missing features, such as changing desktop wallpaper and sharing internet connections.
Windows 7 Home Premium
The Home Premium version, created with home users in mind, provided a richer media experience to homes. It included features like Windows Media Center and multi-touch compatibility for high-end touch screens.
Windows 7 Professional
This version of Windows 7 was designed for small enterprises and power users. Its features, including a Remote Desktop and better file backup capabilities, may be useful to professionals and corporate users. The Enterprise version was designed for medium to big enterprises and included many sophisticated features. DirectAccess, BranchCache, and the well-known BitLocker drive encryption were among them.
Windows 7 Ultimate
It was designed for PC enthusiasts and power users and included every Windows 7 feature, from BitLocker to language user interface packs. The Ultimate, the most complete edition, integrated the features of all earlier versions. It had everything from Windows 7 rolled into one.
FAQs:
Will Windows 7 Run On 4 GB Of RAM?
That is possible. Windows 7 requires a minimum of 2 GB of RAM. As a result, you can run Windows 7 with ease on 4 GB of RAM. Make certain that the 32-bit version of the operating system is installed.
Is Windows 7 ISO Still Available?
The Windows 7 ISO image is still available for download. You may download it directly from Microsoft’s server, as described in the article, or via the third-party direct links above.
Is It Legal To Download These Windows 7 ISOs?
The Windows 7 ISO files are, in fact, directly downloaded from the Microsoft server, as previously mentioned. You can download the previous Windows installation.
Is It A Genuine Windows 7 ISO File?
The Windows 7 ISO files are, in fact, directly downloaded from the Microsoft server, as previously mentioned. You can download the previous Windows installation.
Is It Possible To Upgrade From 32-bit Windows 7 To 64-bit Windows 7?
The simple answer is YES; upgrading Windows 7 from 32-bit to 64-bit is feasible. However, check to see whether your processor supports 64-bit processors. We mentioned the official method of checking for it. There is a freeware program that will tell you how capable you are. GRC may be used to assess the capacity of your processor.
Will I Receive Windows 7 Updates?
After entering the product key, you should get updates for Windows. All original Windows products get timely updates. Remember that the support for Windows 7 will cease in January 2020. The OS no longer receives security updates.
Which One Is The Best App To Create Windows 7 Bootable?
On the Internet, there are several tools accessible. In truth, Microsoft promises to supply a DVD/USB utility that is no longer officially accessible. It is available for download from third-party websites, but we do not advocate it. Rufus was used to write ISO images to a USB drive. It’s a free program that easily handles diverse partitions and booting systems.
Should I Download Windows 7 From Torrent?
Downloading Windows 7 ISO via a torrent may be dangerous. You never know what a few torrent uploaders are up to when they package adware or hazardous files for your computer. Downloading Windows 7 from the official source is better.
Can We Just Copy Windows 7 ISO To The USB Drive To Make It Bootable?
This is more challenging than it seems. You must first create a couple of partitions before copying files. In a word, copying Windows 7 ISO files to a USB drive is challenging to make it bootable.
What Is The Best Version Of Windows 7?
Windows 7 Ultimate is the greatest version of Windows 7 since it includes BitLocker technology in addition to all of the features included in the Basic and Home Premium versions.
Consider The Following:
Conclusion:
This article discussed how to download Windows 7 ISO onto your computer. As a result, you can learn how to install Windows 7 using a USB bootable. You can use Rufus without hesitation. Users have used it for over a decade to make bootable Windows drives/DVDs.